I’ve been excited to write about X-ray for a while now, but I’ve not had the time. But the opportunity has presented itself where I could kill two birds with one stone and do some performance comparisons between Nutanix AHV Turbo Mode and other platforms on the same underlying hardware, so what better time to review X-ray as part of this process.
So for those of you who have not heard of X-Ray, it wouldn’t be unreasonable to assume it’s just another benchmarking tool to further muddy the waters when comparing different platforms.
However X-Ray takes a different approach, to quote Paul Updike who is part of Nutanix Technical Marketing Engineering:
Normally performance is your test variable and you measure the effect on the system. X-ray is upside down, performance of an app in a VM is the control and our test variable is the system. We measure the effect on the control.
So if all you want is “hero numbers” you’ve come to the wrong place, although X-Ray does have a peak performance micro-benchmark test built-in, it’s far from real world in comparison to the other tests within X-ray.
The X-Ray virtual appliance is recommended to be ran on a cluster which is not the target for the testing, such as a management cluster. But for those environments where this additional hardware may not be available, it can also be deployed on VirtualBox or VMware Workstation on your PC or laptop.
Also if you have an Intel NUC, you could deploy Nutanix Community Edition (CE) and run X-Ray on CE which is based on AHV.
In addition to the different approach X-ray takes to benchmarking, I like that X-ray performs fully automated testing across multiple hypervisors including ESXi, AHV as well as different underlying storage. This helps ensure consistent and fair comparisons between platforms, or even comparisons between Nutanix node types if you decide to compare model types before making a purchasing decision.
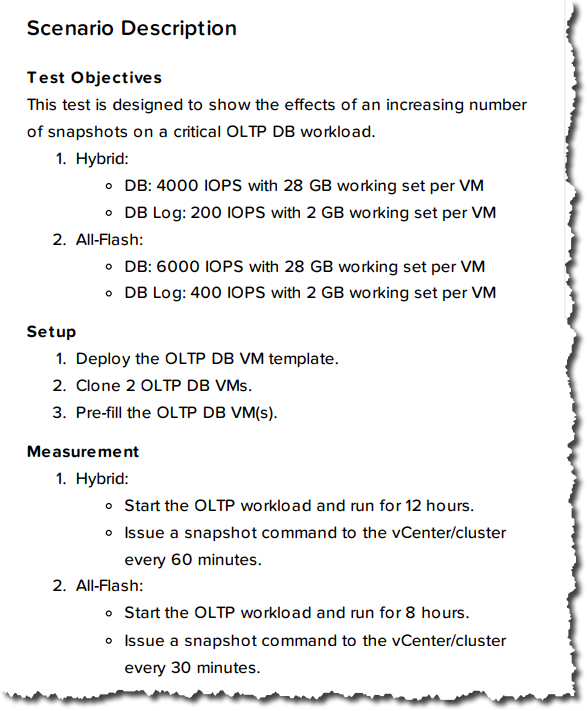
X-ray has several built in tests which are focused not just on outright performance, but on how a system functions and performs during node failure/s, with snapshots as well as during rolling upgrades.
The reason Nutanix took this approach is because it is much more real world than simply firing up I/O meter with lots of outstanding I/O with a 100% random 4k read. In the real world, customers performance upgrades (hopefully regularly to take advantage of new functionality and performance!), hardware does fail when we can least afford it and using space efficient snapshots as part of an overall backup strategy makes a lot of sense.
Now let’s take a look at the X-Ray interface starting with an overview:

X-Ray is designed to be similar to PRISM to keep that great Nutanix look and feel. The tool is very simple to use with three sections being Tests, Analyses and Targets.
To get started is very quick/easy, just open the “Targets” view (shown below) and select “New Target”.
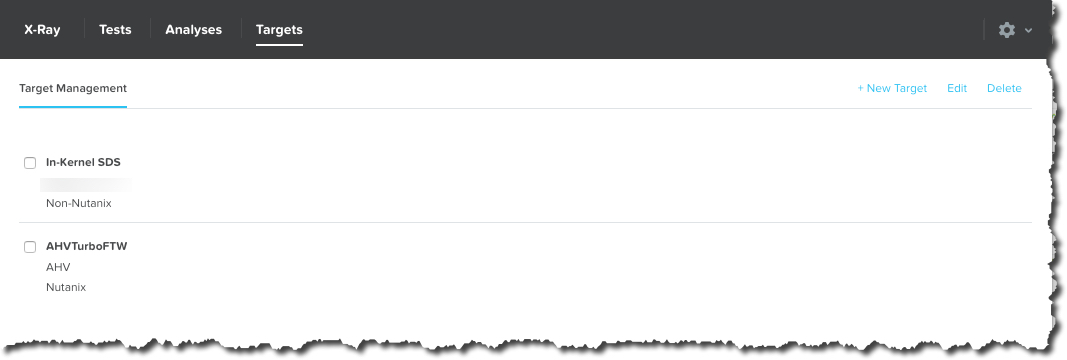
In the “Create Target” popup, you simply, provide a name for the target e.g.: “Nutanix NX-3460 Cluster AHV”, select the Manager type, being either vCenter for ESXi environments or PRISM for AHV.
Then select the cluster type, being Nutanix (i.e.: A Nutanix NX, Dell XC, Lenovo HX or HPE/Cisco software only) OR “Non-Nutanix” which is for comparisons with platforms not running Nutanix AOS such as VMware vSAN.

For VMware environments, you then provide the vCenter details and regardless of the hardware type or platform, you supply the out of band management (e.g.: IPMI) details. The out of band management details allow X-ray to perform simulated hardware failure tests which are critical to any product evaluation and pre-production operational verification testing.
X-Ray then allows you to select the cluster, container (or datastore) and networking (e.g.: Port Group) to be used for the testing.

X-ray then discovers the nodes (e.g.: ESXi Hosts) and allows you to add nodes and confirm the IPMI type to ensure maximum compatibility.

Now hit “Save” and you’re good to go! Pretty simple right?
Now to run a test, simply click the test you want to run and select “Add to Queue”.

The beauty of this is X-ray allows you to queue as many tests as you want and leave the system to run the tests, say overnight or over a weekend without requiring you to monitor them and start tests one by one.
In between tests the target systems are cleaned up (i.e.: data and VMs deleted) to ensure consistent / fair results even when running test packages one after another.
Once a test has been ran, you can view the results in the X-Ray GUI (as shown below):

You can also generate a PDF report for individual tests or perform analysis between two tests including of different platforms:

The above results show and overlay between two platforms, the first being AHV (although it’s incorrectly named Turbo mode when it was ran using non Turbo mode AOS version 5.1.1). As we can see, AHV even without turbo mode was more consistent than the other platform.
To create a PDF report, simply use the “Actions” drop down menu and select “Create Report”.
The report will create a report which covers off details about X-ray, the Target cluster/s, the scenario being tested and the test results.

It will show simple results such as if the test passed (i.e.: Completed the required tasks) and things like test duration as shown below:

X-Ray also provides built-in tests for mixed workloads, which is much more realistic than testing peak performance for point (or siloed) solutions which are become more and more rare these days. 
X-Ray’s built in tests are also auto scaling based on the cluster size of the target and allow tuning of the scenario. For example, in the VDI simulator scenario, Task, Knowledge or Power Users can be selected.

Summary:
X-Ray provides a tool which is free of charge, multi-hypervisor, multi-platform (including non-HCI) which is easy to use for proof of concepts, product comparisons as well as real world, operational verification.
I am working with the X-ray team to develop new built in test scenarios to simulate real world scenarios for business critical applications as well as to allow customers and 3rd parties to validate the benefits of functionality such as data locality.
The following is a series of posts covering Nutanix AHV Turbo Mode performance/functionality comparisons with other products.
Nutanix X-Ray Benchmarking tool Part 2 -Snapshot Impact Scenario
Nutanix X-Ray Benchmarking tool Part 3 – Extended Node Failure Scenario