Knowing a Virtual Machines Active Working Set is critical to ensuring all flash performance in any hybrid storage solution (Flash + SAS or SATA).
Because this is so critical, Nutanix has tracked this information for a long time via the hidden 2009 page. However as this information being available has proven to be so popular, it was included in PRISM in the latest release of Nutanix Acropolis Base Version 4.5.
The working set size for a virtual machines active working set can be viewed on a per vdisk basis across all supported hypervisors including ESXi, Hyper-V, KVM and the Acropolis Hypervisor (AHV).
To view this information, from the “Home” screen of PRISM, select the “VM” as shown below:
Note: The following screen shots were taken from an environment running Acropolis Base Version 4.5 and Acropolis Hypervisor 20150921 but the same process is applicable to any hypervisor.
Next highlight the Virtual Machine you wish to view details on, In the example below VM “Jetstress01” has been highlighted.
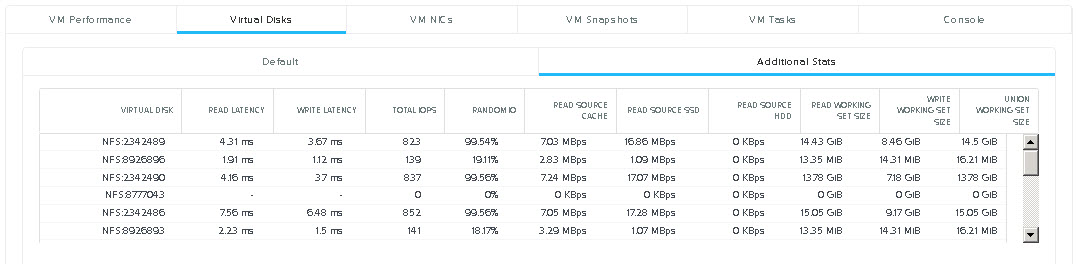
Below the above section you will see the VM summary as shown below. To view the working set size, Select “Virtual Disks” then the “Additional Stats” option which will show the following display: As we can see the following information is displayed on a per vdisk granularity:
- Read / Write Latency
- Total IOPS
- Random IO percentage
- Read Throughput from Extent Cache / SSD and HDD
- Read Working set size
- Write Working set size
- Union Working set size
With the above information it is easy to calculate what node type and SSD capacity is most suitable for the virtual machine. This is something I would recommend customers running business critical applications check out.
If the “Read Source HDD” is showing frequent throughput and performance is lower than desired, moving the VM to a node with a larger SSD capacity will help performance. Alternatively if there are no nodes with a larger SSD tier, enabling in-line compression and/or Erasure Coding can help increase the effective SSD tier capacity and allow a larger working set size to be served from SSD.
If compression and EC-X are enabled and the SSD tier is still insufficient, additional nodes with larger SSD tier can be non disruptively added to the cluster and the virtual machine/s migrated regardless of hypervisor.
Acropolis Base Version 4.5 adds a lot of enhancements such as this so I recommend customers perform the one click upgrade and start exploring and utilizing this additional information.