What if my VMs storage exceeds the capacity of a Nutanix node?

I get this question a lot, What if my VM exceeds the capacity of the node its running on. The answer is simple, the storage available to a VM is the entire storage pool which is made up of all nodes within the cluster and is not limited to the capacity of any single node.

Let’s take an extreme example, a single VM is running on Node B (shown below) and all other nodes have no workloads. Regardless of if the nodes are “Storage only” such as NX-6035C or any Nutanix node capable of running VMs e.g.: NX3060-G4 the SSD and SATA tiers are shared.

AllSSDhybrid

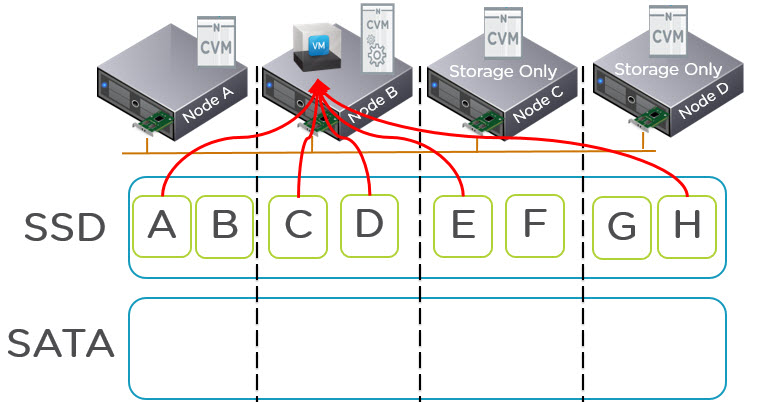
The VM will write data to the SSD tier and only once the entire SSD tier (i.e.: All SSD in all nodes) reaches 75% capacity will ILM tier the coldest data off the to SATA tier. So if the SSD tier never reaches 75% you will have all data in SSD tier both local and remote.

This means multiple CVMs (Nutanix Controller VM) will service the I/O which allows for single VMs to achieve scale up type performance where required.

As the SSD tier exceeds 75% data is tiered down to SATA but active data will still reside in SSD tier across the cluster and be serviced with all flash performance.

The below shows there is a lot of data in the SATA tier but ILM is intelligent enough to ensure hot data remains in the SSD tier.

AllSSDwithColdData

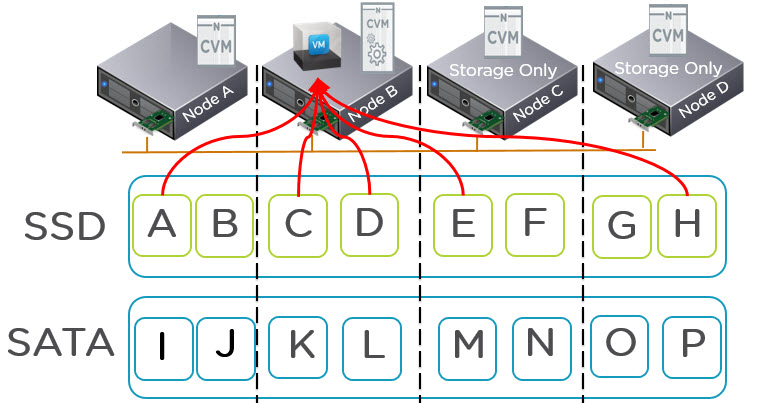
Now what about Data Locality, Data Locality is maintained where possible to ensure the overheads of going across the network are minimized but simply put, if the active working set exceeds the local SSD tier Nutanix ensures maximum performance by distributing data across the shared SSD tier (not just two nodes for example) and services I/O through multiple controllers.

In the worst case where the active working set exceeds the local SSD capacity but fits within the shared SSD tier, you will have the same performance as a Centralised All Flash Array, in the best case, Data Locality will avoid the requirement to traverse the IP network and service reads locally.

If the active working set exceeds the shared SSD tier, Nutanix also distributes data across the shared SATA tier and services I/O from all nodes within the cluster as explained in a recent post “NOS 4.5 Delivers Increased Read Performance from SATA“.

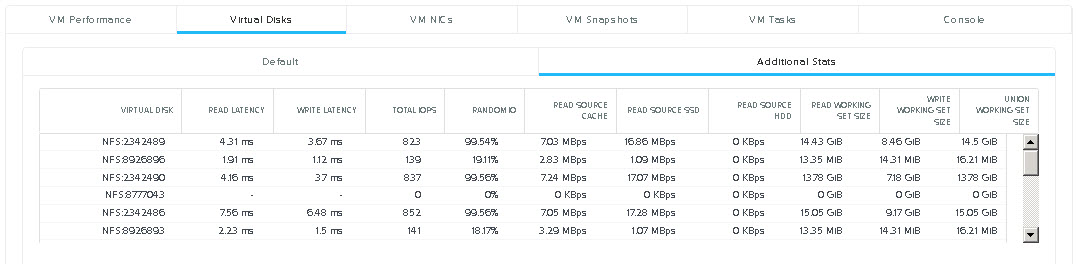
Ideally I recommend sizing the Active working set of VMs to fit within the local SSD tier but this is not always possible. If you’re running Nutanix you can find out what the active working set of a VM is via PRISM (See post here) and if you’re looking to size for a Nutanix solution, use my rule of thumb for sizing for storage performance in the new world.

Bug Life: vSphere 6.0 Network I/O Control & Custom Network Resource Pools

In a previous post How to configure Network I/O Control (NIOC) for Nutanix (or any IP Storage) I showed just how easy configuring NIOC is back in the vSphere 5.x days.

In was based around the concepts of Shares and Limits, of which I have always recommended shares which enable fairness while allowing traffic to burst if/when required. NIOC v2 was a Simple, and effective solution for sure.

Enter NIOC V3 in vSphere 6.0.

Once you upgrade to NIOC v3 you can no longer use the vSphere C# client and NIOC also now has the concept of bandwidth reservations as shown below:

NIOCoverview

I am not really a fan of reservations in NIOC or for CPU (memory is good though) and in fact I’ll go as far as to say NIOC was great in vSphere 5.x and I don’t think it needed any changes.

However with vSphere 6.0 Release 2494585 when attempting to create a custom network resource pool under the “Resource Allocation” menu by using the “+” icon (as shown below) you may experience issues.

As shown below, before even pressing the “+” icon to create a network resource pool, the Yellow warning box tells us we need to configure a bandwidth reservation for virtual machine system traffic first.

issue1

So my first though was, Ok, I can do this, but why? I prefer using Shares as opposed to Limits or reservations because I want traffic to be able to burst when required and for no bandwidth to be wasted if certain traffic types are not using it.

In any case, I followed the link in the warning and went to set a minimal reservation of 10Mbit/s for Virtual machine traffic as shown below.

Pix3

When pressing “Ok” I was greeted with the below error saying the “Resource settings are invalid”. As shown below I also tried higher reservations without success.

Pix2

I spoke to a colleague and had them try the same in a different environment and they also experienced the same issue.

I have currently got a call open with VMware Support. They have acknowledge this is an issue and is being investigated. I will post updates as I hear from them so stay tuned.

How to view a VMs Active Working Set in PRISM

Knowing a Virtual Machines Active Working Set is critical to ensuring all flash performance in any hybrid storage solution (Flash + SAS or SATA).

Because this is so critical, Nutanix has tracked this information for a long time via the hidden 2009 page. However as this information being available has proven to be so popular, it was included in PRISM in the latest release of Nutanix Acropolis Base Version 4.5.

The working set size for a virtual machines active working set can be viewed on a per vdisk basis across all supported hypervisors including ESXi, Hyper-V, KVM and the Acropolis Hypervisor (AHV).

To view this information, from the “Home” screen of PRISM, select the “VM” as shown below:

Note: The following screen shots were taken from an environment running Acropolis Base Version 4.5 and Acropolis Hypervisor 20150921 but the same process is applicable to any hypervisor.

PRISMVMmenu

Next highlight the Virtual Machine you wish to view details on, In the example below VM “Jetstress01” has been highlighted.VMlist

Below the above section you will see the VM summary as shown below. To view the working set size, Select “Virtual Disks” then the “Additional Stats” option which will show the following display:WorkingSetSizeAdditionalDetailsAs we can see the following information is displayed on a per vdisk granularity:

  1. Read / Write Latency
  2. Total IOPS
  3. Random IO percentage
  4. Read Throughput from Extent Cache / SSD and HDD
  5. Read Working set size
  6. Write Working set size
  7. Union Working set size

With the above information it is easy to calculate what node type and SSD capacity is most suitable for the virtual machine. This is something I would recommend customers running business critical applications check out.

If the “Read Source HDD” is showing frequent throughput and performance is lower than desired, moving the VM to a node with a larger SSD capacity will help performance. Alternatively if there are no nodes with a larger SSD tier, enabling in-line compression and/or Erasure Coding can help increase the effective SSD tier capacity and allow a larger working set size to be served from SSD.

If compression and EC-X are enabled and the SSD tier is still insufficient, additional nodes with larger SSD tier can be non disruptively added to the cluster and the virtual machine/s migrated regardless of hypervisor.

Acropolis Base Version 4.5 adds a lot of enhancements such as this so I recommend customers perform the one click upgrade and start exploring and utilizing this additional information.