How to validate VMware Certifications

It seems of late there is more and more people claiming to be VCDX as well as VCAP when they are not. This to me shows the people have no integrity and I would not want to work with a person who lied about a certification to try and get a job.

Luckily there is an easy way to validate if a person has a certification or not.

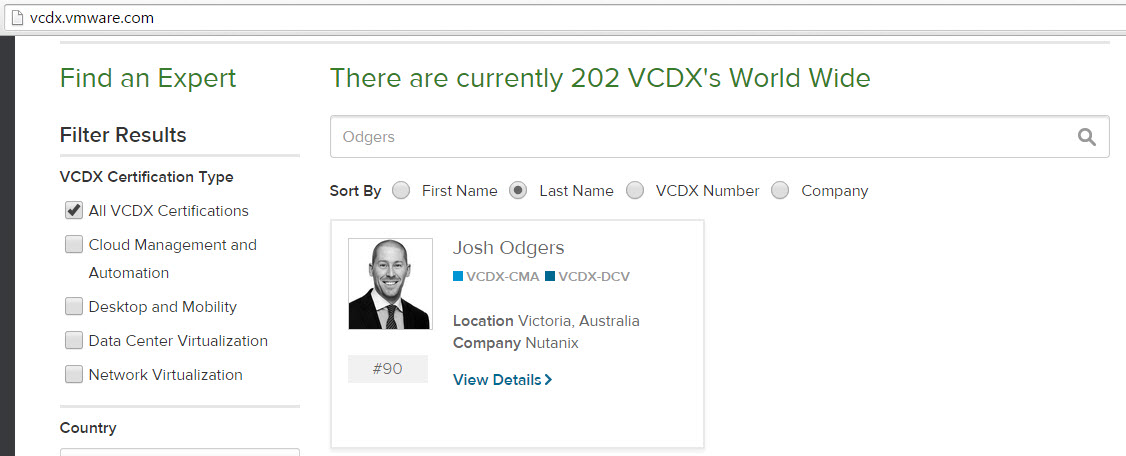
For VCDX its super easy, visit http://vcdx.vmware.com and enter the persons First Name, Last Name , VCDX Number or Company and you can quickly find out if they are VCDX or not.

See example below:

findvcdx1

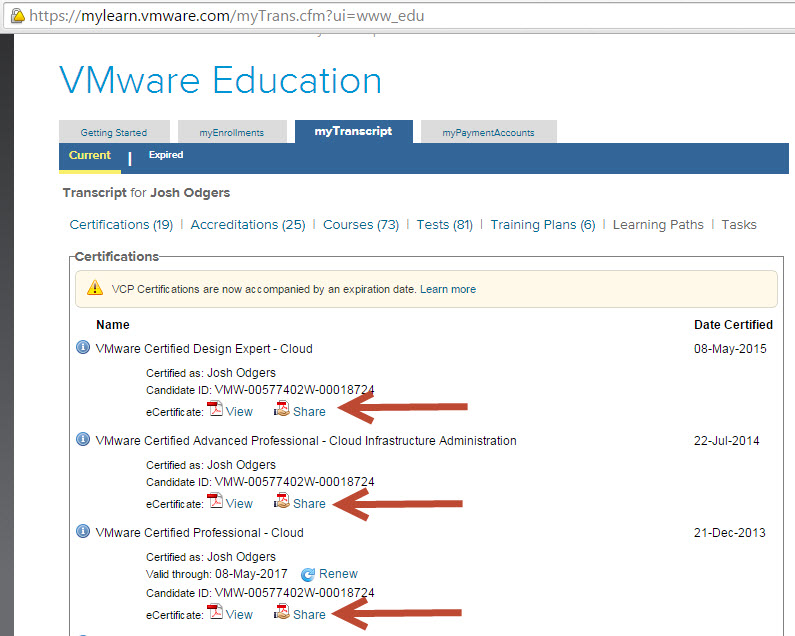
Another way is to have the person login to http://mylearn.vmware.com and open their transcript. The transcript shows all VMware certifications including VCA , VCP, VCAP , VCIX and VCDX.

The following shows part of my transcript which shows VCDX, VCAP and VCP certs inc:

  • VMware Certified Design Expert – Cloud
  • VMware Certified Advanced Professional – Cloud Infrastructure Administration
  • VMware Certified Professional – Cloud

certshare

You will also see the “Share” button, what this does is allow you to give a URL to a prospective employer or recruiter for them to validate your certification/s.

To use this facility, simply click the “Share” button and you will be prompted with a window similar to the below:

ShareYoureCert

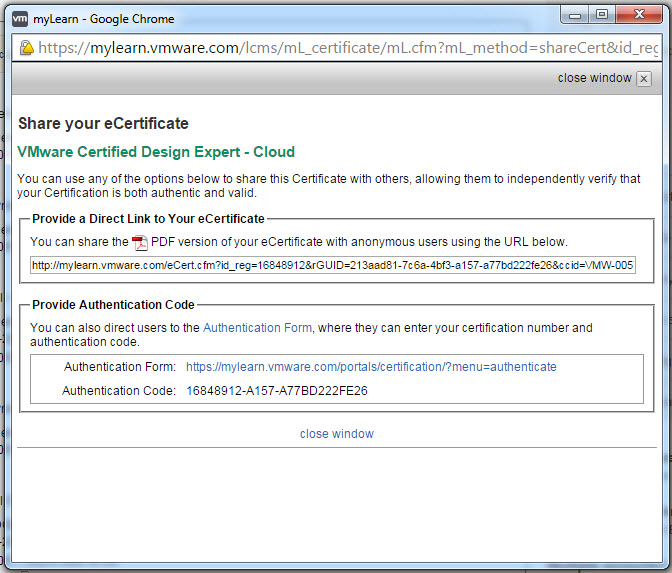
This gives you two options:

1. Share the PDF version of your certificate with anyone by simply copy and pasting the URL.

You will see something similar to this:

ecertpdf

2. Share the Certification Authentication form URL and Code and allow anyone to check the current status of your certification.

The following is what you will see when you click the Authentication Form button:

authcert

Simply type the random numbers and click Authenticate and you will see something similar to the below:
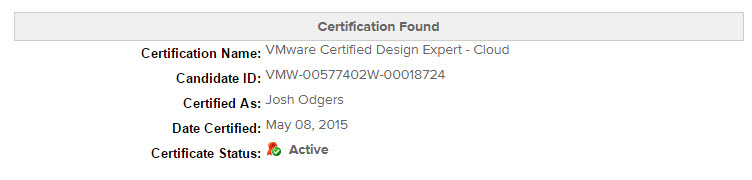
CertFound

Simple as that!

I hope this post helps potential employers and recruiters validate candidates credentials and stamp out this growing trend of people claiming they have VMware certifications (especially VCDX) when they don’t.

The Key to performance is Consistency

In recent weeks I have been doing lots of proof of concepts and performance testing using tools such as Jetstress (with great success I might add).

What I have always told customers is to focus on choosing a solution which comfortably meets their performance requirements while also delivering consistent performance.

The key word here is consistency.

Many solutions can achieve very high peak performance especially when only testing cache performance, but this isn’t real world as I discussed in Peak Performance vs Real World Performance.

So with two Jetstress VMs on a 3 node Nutanix cluster (N+1 configuration) I configured Jetstress to create multiple databases which used about 85% of the available capacity per node. The nodes used were hybrid, meaning some SSD and some SATA drives.

What this means is the nodes have ~20% of data within the SSD tier and the bulk of the data residing within the SATA tier as shown in the Nutanix PRISM UI on the Storage tab as shown below.

Tierusage

As Jetstress performs I/O across all data concurrently, it means that things like caching and tiering become much less effective.

For this testing no tricks have been used such as de-duplicating Jetstress DBs, which are by design duplicates. Doing this would result in unrealistically high dedupe ratios where all data would be served from SSD/cache resulting in artificially high performance and low latency. That’s not how I roll, I only talk real performance numbers which customers can achieve in the real world.

In this post I am not going to talk about the actual IOPS result, the latency figures or the time it took to create the databases as I’m not interested in getting into performance bake offs. What I am going to talk about is the percentage difference in the following metrics between the nodes observed during these tests:

1. Time to create the databases : 1.73%

2. IOPS achieved : 0.44%

3. Avg Read Latency : 4.2%

As you can see the percentage difference between the nodes for these metrics is very low, meaning performance is very consistent across a Nutanix cluster.

Note: All testing was performed concurrently and background tasks performed by Nutanix “Curator” function such as ILM (Tiering) and Disk Balancing were all running during these tests.

What does this mean?

Running business critical workloads on the same Nutanix cluster does not cause any significant noisy neighbour types issues which can and do occur in traditional centralised shared storage solutions.

VMware have attempted to mitigate against this issue with technology such as Storage I/O Control (SIOC) and Storage DRS (SDRS) but these issues are natively eliminated thanks to the Nutanix scale out shared nothing architecture. (Nutanix Xtreme Computing Platform or XCP)

Customers can be confident that performance achieved on one node is repeatable as Nutanix clusters are scaled even with Business Critical applications with large working sets which easily exceed the SSD tier.

It also means performance doesn’t “fall of the cache cliff” and become inconsistent, which has long been a fear with systems dependant on cache for performance.

Nutanix has chosen not to rely on caching to achieve high read/write performance, instead we to tune our defaults for consistent performance across large working sets and to ensure data integrity which means we commit the writes to persistent media before acknowledging writes and perform checksums on all read and write I/O. This is key for business critical applications such as MS SQL, MS Exchange and Oracle.

My NPX Journey

I have had an amazing learning experience in the last few months, expanding my skills into a second hypervisor being Kernel Virtual Machine (KVM) as well as continuing to enhance my knowledge on the ever increasing functionality of the Nutanix platform itself.

This past week I have been in Miami with some of the most talented guys in the industry who I have the pleasure to work with. We have been bootstrapping the Nutanix Platform Expert (NPX) program and have had numerous people submit comprehensive documentation sets which have been reviewed, and those who met the (very) high bar, were invited to the in-person, panel based Nutanix Design Review (NDR).

I was lucky enough to be asked to be part of the NDR panel as well as being invited to the NDR to attempt my NPX.

Being on the panel was a great learning experience in itself as I was privileged to observe many candidates who presented expert level architecture, design and troubleshooting abilities across multiple hypervisors.

I presented a design based on KVM for a customer which I have been working with over the last few months who is deploying a large scale vBCA solution on Nutanix.

I had an All-Star panel made up entirely of experienced Nutant’s who all happen to also be VCDXs, its safe to say it was not an easy experience.

The Design Review section was 90 mins which went by in a heart beat where I presented my vBCA KVM design, followed by a 30 min troubleshooting session and 60 min design scenario also based on vSphere.

Its a serious challenge having to present at an expert level on one Hypervisor, then swap into troubleshooting and designing a second hypervisor, so by the end of the examination it was safe to say I went to the bar.

As this is a bootstrap process I was asked to leave the room while the panel performed the final scores, then I was invited back in the room and told I was

Congratulations NPX #001

I am over the moon to be a part of an amazing company and to be honoured with the being #001 of such an challenging certification. I intend to continue to pursue deeper level knowledge on multiple hypervisors and everything Nutanix related to ensure I do justice to being NPX #001.

I am also pleased to say we have crowned several other NPX’s but I won’t steal there thunder by announcing their names and numbers.

For more information on the NPX program see http://go.nutanix.com/npx-application.html

Looking forward to .NEXT conference which is on this week!