How to successfully Virtualize MS Exchange – Part 17 – Virtual Machine Storage Configuration

In addition to Part 16 where we discussed Virtual Disk Provisioning options and recommendations, In this part we will cover how to optimally configure a Virtual Machine for an Exchange MBX/MSR workload from a virtual storage controller perspective.

Once you have made the decision on storage platform, and assuming you have chosen to use VMFS or NFS datastores (and not iSCSI in-Guest or RDMs), then this article is for you.

Virtual Machines just like physical servers, have SCSI controllers (albeit virtual) and ESXi has a number of options to choose from which include:

1. BusLogic Parallel
2. LSI Logic Parallel
3. LSI Logic SAS
4. Paravirtual SCSI (PVSCSI)
5. AHCI SATA Controller

By default when creating a new virtual machine the default adapter for Windows 2008 and 2012 is “LSI Logic SAS” because Windows does not have the PVSCSI driver by default.

BusLogic ParallelLSI Logic Parallel adapters are not recommended for Windows 2008/2012 as they are legacy controllers with lower performance, as such I will not cover these in any more detail as they are irrelevant to Exchange deployments.

Instead I will cover the LSI Logic SASAHCI SATA Controller and Paravirtual SCSI (PVSCSI) adapters.

Starting with LSI Logic SAS,

This is the default controller for Windows 2008/2012 VMs, as a result, it is very common to see Exchange deployments using this controller. It has good performance and works out of the box with a Windows install without requiring drivers.

Advantages:

1. The default Controller for Windows 2008/2012
2. No need for manually inserting drivers to install Windows
3. Higher performance than AHCI SATA controller

Disadvantages:

1. Lower performance than PVSCSI
2. Higher CPU overheads in Guest compared to PVSCSI
3. Higher latency than PVSCSI
4. Lower maximum number of VMDKs supported per controller (15) compared to AHCI SATA (30)

Next let’s discuss the AHCI SATA Controller.

The AHCI SATA controller is new in vSphere 5.5 and is only supported in Virtual Machines with Hardware version 10. The SATA controller can be used on its own or in addition to LSI or PVSCSI controllers to provide additional VMDKs / Capacity which increases a single VMs maximum capacity from ~3.7PB to over 11PB.

Advantages:

1. Can support 30 VMDKs per Controller (120 total) compared to 15 for LSI / PVSCSI
2. Can be used in addition to PVSCSI controllers to provide more storage performance and capacity per Exchange VM (if required)
3. High capacity supported per controller than LSI Logic / PVSCSI

Disadvantages:

1. Higher CPU utilization per IO compared to LSI / PVSCSI options
2. Lower overall performance compared to LSI and PVSCSI
3. Higher latency compared to LSI and PVSCS

And Finally the Paravirtual SCSI Controller.

The PVSCSI controller is the highest performing controller and has been supported since ESXi 4.0 and are design for high performance storage environments and are available for virtual machines running hardware version 7 and later.

Advantages:

1. Performance , Performance , Performance. Oh yeah and did I mention performance?
2. Lower Latency and Higher IOPS compared to other controllers
3. Lower CPU overhead on the Guest OS (and therefore ESXi)
4. More CPU is available for Exchange due to lower CPU overheads

Disadvantages:

1. Windows Failover Clustering is not supported, but this has no impact on MS Exchange including DAG deployments.
2. PVSCSI is not the default and requires inserting drivers into the Windows installation OR the VM to be built on LSI Logic SAS and once VMware Tools is installed, swapping to PVSCSI.
3. Lower maximum VMDKs supported per controller (15) compared to AHCI SATA (30)

Performance Comparison

From a performance perspective, Michael Webster (VCDX#66) wrote this great post “VMware vSphere 5.5 Virtual Storage Adapter Performance” and produced the following graph showing a comparison between SATA, LSI Logic SAS and PVSCSI controllers from an IOPS, Latency perspective.

VMware-vSphere-5.5-Virtual-Storage-Adapter-Performance

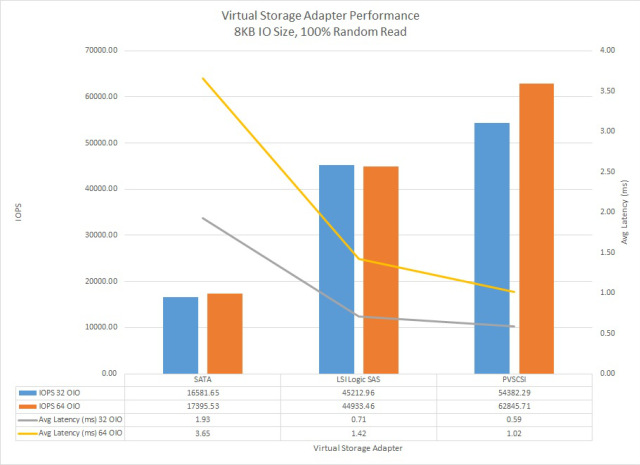
As we can see, the PVSCSI adapter has significantly lower latency and higher IOPS than the SATA and LSILogic SAS controllers even when running on the same underlying storage.

While the Microsoft Exchange team have managed to successfully reduce I/O throughout the versions (2007-2013) the performance advantages also have a positive benefit on vCPU utilization.

Michael’s post states:

It (PVSCSI Controller) also had the lowest CPU usage. During the 32 OIO test SATA showed 52% CPU utilization vs 45% for LSI Logic SAS and 33% for PVSCSI.

What this means is less CPU utilization is used for I/O and lower average latency means more CPU is available for MS Exchange along with less CPU WAIT time (where the CPU is waiting for IO to complete before continuing). This means your onto a winner especially considering Exchange 2013 is very CPU intensive.

Which Controller should be used for Exchange VMs?

VMware have published the KB article “Do I choose the PVSCSI or LSI Logic virtual adapter on ESX\ESXi 4.0 for non-IO intensive workloads? (1017652)” which in summary explains:

The test results show that PVSCSI is better than LSI Logic, except under one condition–the virtual machine is performing less than 2,000 IOPS and issuing greater than 4 outstanding I/Os. This issue is fixed in vSphere 4.1 and later version, so that the PVSCSI virtual adapter can be used with good performance, even under this condition.


As the one caveat prior to vSphere 4.1 where LSI Logic can outperform PVSCSI, there are no significant downsides to using the PVSCSI compared to LSI as such, I recommend always using (multiple) PVSCSI adapters.

Now that we have decided on the PVSCSI adapter, what’s next?

As with physical servers, Virtual SCSI controllers including PVSCSI have their limits in terms of performance and scalability. To ensure maximum scalability, performance and low latency, multiple PVSCSI adapters should be used with all VMDKs evenly spread over the PVSCSI adapters as recommended in Part 11.

To do this, when adding a VMDK to the Exchange VM, ensure you select a different SCSI controller (which are created automatically on demand) by using the drop down box “Virtual Device Node” and selecting for example SCSI (1:0) as shown below.

MSRVMPVSCSI10

For subsequent VMDKs you must then select SCSI (2:0) as shown below.

MSRVMPVSCSI20

And then SCSI (3:0)

MSRVMPVSCSI30

For the forth VMDK, you then select SCSI (0:1) because SCSI (0:0) is taken by the VMDK used for the guest OS.

MSRVMPVSCSI01

Repeat the above process until you have sufficient VMDKs for your Exchange server VM.

The following illustrates my recommended configuration showing how to configure a VM supporting 8 database drives and 8 log drives.PVSCSIVMDKs

The above configuration will ensure maximum storage performance and can be expanded in the same configuration to support more than 3 times the number of databases + logs shown above and as such it is suitable for even very large (scale-up) Exchange MBX/MSR VMs.

For example, if each VMDK in the above configuration was just 4TB in size it would give you 64TB usable capacity and the VM can be scaled more than 3x the number of VMDKs.

Note: VMDKs can scale to 62TB (from vSphere 5.5) each although this may result in reduced performance.

TIP: Don’t forget to spread VMDKs evenly across datastores as per the recommendation in Part 11.

Recommendations for Exchange VM Storage Configuration:

1. Use multiple Paravirtual SCSI (PVSCSI) Adapters.
2. Use one VMDK per Database or Logs
3. Spread VMDKs evenly across multiple PVSCSI adapters
4. Spread VMDKs evenly across multiple datastores when using VMFS datastores
5. Spread VMDKs evenly across multiple datastores when using NFS datastores ensuring NFS datastores are served via multiple NAS controllers
6. Use more VMDKs as opposed to fewer larger VMDKs
7. Format NTFS volumes with an Allocation Unit Size of 64k
8. Keep it simple, do not mix virtual SCSI controller types.

Back to the Index of How to successfully Virtualize MS Exchange.

How to successfully Virtualize MS Exchange – Part 16 – Virtual Disk Provisioning Types

Once you have made the decision on storage platform, and assuming you have chosen to use VMFS or NFS datastores, the next decision is how should my VMDKs be provisioned?

The VMware Exchange 2013 Best Practice Guide does not make mention of disk provisioning options nor does it make any recommendations, however you’re in luck as we will cover all the options along with pros and cons here.

For Exchange 2010, Microsoft state in Understanding Exchange 2010 Virtualization:

Virtual disks that dynamically expand aren’t supported by Exchange.

Virtual disks that use differencing or delta mechanisms (such as Hyper-V’s differencing VHDs or snapshots) aren’t supported.

However I have been unable to find confirmation if this has changed or not for Exchange 2013 in the Exchange 2013 storage configuration options document which does state Thin provisioning for Storage spaces is supported but it does not state that any other form of thin provisioning is or is not supported.

While technically not supported in 2010, there is plenty of experts who understand and recommend thin provisioning including MCM and MVP for Exchange Dustin Smith who in this video talks about some of the considerations and benefits of thin Provisioning for Exchange 2010.

Now on to the topic at hand:

When creating a Virtual Machine, VMDK/s can be provisioned in one of three ways, these are:

1. Thick Provisioned Lazy Zeroed
2. Thick Provisioned Eager Zeroed
3. Thin Provisioned

Starting with Thick Provisioned Lazy Zeroed this means that the VMDK is thick provisioned but only zeroed in a just in time fashion.

The advantages of Thick Provisioned Lazy Zeroed VMDKs include:

1. Faster VM creation time than Eager Zeroed Thick (Minimal if the storage supports VAAI Write Same primitive) 
2. The entire VMDKs capacity is reserved making capacity planning easier than Thin Provisioning

The disadvantages of Thick Provisioned Lazy Zeroed VMDKs include:

1. Slower provisioning that Thin Provisioning (although the different is generally minimal)
2. The entire VMDKs capacity is reserved and unavailable for use by other virtual machines.

With Thick Provisioned Eager Zeroed (EZT) the VMDK is thick provisioned and all blocked zeroed at the time of creation. Eager Zeroed Thick VMDKs are supported on all VMFS datastores and on NFS datastores which support the VAAI-NAS Reserve Space primitive.

The advantages of EZT VMDKs these days are really minimal but include:

1.  Supporting Oracle RAC and VMware Fault Tolerance (neither being applicable to Exchange)
2. Increased performance verses Lazy and Thin Provisioned VMDKs (but more on this topic later).

However there are a number of downsides to this method which include:

1. Slower VM creation times. The time depends on the size of the VMDK/s being created and the speed of your storage as every Gb needs to be zeroed, just like performing a Full (not quick) format on your physical server.

Note: Storage array’s who support VAAI with the “Write Same” primitive can offload the zeroing to the storage array to reduce the load on the ESXi host and speed up provisioning time dramatically.

2. Increased potential for wasted capacity on a datastore.

3. Free space within VMDKs cannot be shared with other VMs which requires every VMDK have some (generally >10% is recommended) free space per VMDK to ensure the VM does not run out of space.

Lastly there is  Thin Provision which means the VMDK only takes up the amount of space that data is written too and before each write the block must be zeroed.

The advantages of Thin Provisioning VMDKs include:

1. You can create larger VMDKs with no space utilization penalty making capacity planning and growth easier.
2. Reduce wasted or unused space on the storage
3. Allows for disk space to be overcommitted ensuring maximum utilization and flexibility.
4. Free space in VMDKs is not wasted on the datastore reducing capacity requirements compared to Eager and Lazy Zeroed VMDKs.
5. The impact of SCSI reservations (VMFS datastores ONLY) causing performance issues (increased latency) when thin provisioned virtual machines (VMDKs) grow is no longer an issue as the VAAI Atomic Test & Set (ATS) primitive alleviates the issue of SCSI reservations.
6. Thin provisioned VMs reduce the overhead for Storage vMotion , Cloning and Snapshot activities. Eg: For Storage vMotion it eliminates the requirement for Storage vMotion (or the array when offloaded by VAAI XCOPY Primitive) to relocate “White space”. Note: Storage vMotion should rarely if ever be required for Exchange VMs.
7. Thin provisioning leaves maximum available free space on the physical spindles which should improve performance of the storage subsystem as a whole.

The disadvantages of thin provisioning include:

1. Increased risk of running out of space on a datastore or underlying storage array.
2. Additional write penalty of zeroing a block before writing to it. (again more on performance later in this post).
3. Increased importance of monitoring storage capacity utilization.
4. Not supported for Exchange 2010. Note: However there is no technical inhibitor for using Thin Provisioning but supported options are obviously preferable.

All in all, @FrankDenneman (VCDX #29) sums it up perfectly with his article Thin or thick disks? – it’s about management not performance. I would also suggest considering all other workloads in the environment, not just Exchange when making decisions about Thin Provisioning as it can be very beneficial and a huge cost saving (especially CAPEX) when purchasing new equipment.

Which brings us to our next topic, Thin Vs Thick Provisioning Performance!

There have been many recommendations not to use Thin Provisioning due to the performance impact of Zeroing a block before writing to it. This recommendation has been around for a long time, and like the VMDK on NFS debate appears to have strong options on both sides.

Now for the facts!

From a performance perspective most people are surprised to learn there is no significant performance advantage to using Thick Provisioned (Eager or Lazy Zeroed) VMDKs compared to Thin Provisioned disks.

In addition to that, with the reduction of I/O from Exchange 2007 to 2010 being around 50%, and from 2010 to 2013 another 50% reduction in I/O, Exchange is no longer the huge storage I/O heavy monster it once was.

VMware conducted a Performance Study of VMware vStorage Thin Provisioning back in the ESXi 4.0 days (~2009) which I will briefly summarize.

On page 6 of the performance study the following graph shows the different in performance between Thin and Thick VMDKs during zeroing and post-zeroing.

As you can see the performance is almost identical.

ThinThickScaling

The next chart shows also from Page 6 is a comparison of throughput between thin and thick VMDKs. Again we see the difference is insignificant.

AggThrougjputThickvThin

As a result of there being no significant performance impact of using Thin Provisioning, Performance should no longer be considered an objection to using Thin Provisioning!

I recommend taking advantage of the flexibility of using Thin Provisioning and creating larger Thin Provisioned VMDKs which can help simplify capacity management from a VM/OS and application perspective as well as making growth easier for Exchange as mailbox sizes increase over time.

ThinProvision

When using thin provisioning always ensure you have your alerting properly set-up with early warning on your vSphere environment AND underlying storage to advise when storage capacity of a datastore or underlying LUN/NFS mount or storage is running low so this can be remediated.

In an upcoming post I will discuss the underlying storage, including provisioning type for LUNs and NFS mounts (i.e.: Thin on Thick / Thin on Thin / Thick on Thick and Thick on Thin).

Recommendations for VMDK provisioning:

1. Check with your storage vendor and unless they have solid justification for not using Thin Provisioning OR you have an operational constraint preventing it, use Thin Provisioned VMDKs. (The pros outweigh the cons in my opinion)
2. When using Thin Provisioning create larger VMDKs to simplify capacity management at the VM and OS/Application layer.
3. When using Thick or Thin provisioning, ensure you test performance using Jetstress and LoadGen with the same provisioning type.
4. Ensure alerting is configured and working to monitor capacity utilization especially when using thin provisioned VMDKs.

Back to the Index of How to successfully Virtualize MS Exchange.

More Information on VMDK and Datastore provisioning options:

1. Example Architectural Decision – Datastore (LUN) and Virtual Disk Provisioning (Thin on Thin)

2. Example Architectural Decision – Datastore (LUN) and Virtual Disk Provisioning (Thin on Thick)

Back to the Index of How to successfully Virtualize MS Exchange.

How to successfully Virtualize MS Exchange – Part 4 – DRS

DRS is a well known feature of vSphere which is designed to help load balance virtual environments for optimal performance.

With most virtual workloads, DRS does an excellent job of load balancing, so leaving DRS set to “Fully Automated” without specifying any DRS rules is fine.

The “Migration Threshold” can be adjusted from Conservative to Aggressive in 5 increments, with the default being “3” which I recommend.

For more information on this recommendation see : Example Architectural Decision – DRS Automation Level

These two settings are shown below:

NoSAN-ClusterDRSsettings

However with MS Exchange VMs which are CPU and RAM intensive, it doesn’t make sense to have these VMs moved around automatically if it can be avoided. If Exchange MBX / MSR VMs were vMotioned, it may take several minutes for the process to complete, during which time, depending on the vMotion configuration and bandwidth, could result in performance degradation. As a result, avoiding vMotion where possible reduces the risk to Exchange.

Note: I am not saying vMotion does not work, or cannot be configured to work very well for large VMs like MBX/MSR, but if vMotion can be avoided without adding significant complexity or operational cost to an environment, I try to avoid it except during planned maintenance activities.

I still however recommend enabling DRS and configuring it in “Fully Automated” mode, but by combining it with DRS rules for MBX / MSR VMs we can provide both higher and more consistent performance for MS Exchange.

To achieve this I recommend the following:

Create a “Host DRS Group” for each ESXi host in the cluster where Exchange VMs are expected to run and naming them with the ESXi hosts name to make them easily identifiable.

NoSAN-DRS-HostDRSGroup

Next I recommend creating a “VM DRS Group” per Exchange Mailbox VM and naming the VM DRS Group as the Exchange MBX or MSR server name OR another easily identifiable name such as “Exchange DAG Node 1” shown below.

NoSANRSGroup-ExchDAG1

Now that we have our “Host DRS Group/s” and “VM DRS Group/s” created, we setup a DRS “Virtual Machines to Hosts” rule per MBX/MSR VM and ESXi host with the policy “Should run of hosts in group” as shown below.

NoSANExch01ShouldRunHost1

What the above rule does is ensure the MSR or MBX VM runs only on the specified ESXi host unless there is an ESXi host failure, in which can it can automatically restart on another node within the cluster.

NoSAN-DRSRule-ShouldRunOnHostsInGroup

The below screenshot shows an example of what the recommended DRS rules would be in an environment had four MSR or MBX servers.  NoSANExchangeShouldRules

The above rules will result in the MBX or MSR VMs running on separate hosts as shown below.

NoSAN_ExchangeVMs_OnePerHost

Advantages of this DRS configuration:

1. Ensures no compute or network contention between the Exchange VMs
2. Ensures no storage layer contention between Exchange VMs such as HBA queue depths, NIC Note: This will not eliminate storage contention which may exist at a SAN/NAS layer.
3. DRS will not automatically move an MBX or MSR VM meaning performance will not potentially be impacted by the vMotion activity
4. HA is still fully functional
5. vMotion can still be used if required. e.g.: Prior to host maintenance.
6. DRS will still automatically load balance VMs throughout the cluster to ensure optimal performance of all ESXi hosts
7. More efficient than simply using Anti-Affinity rules for MBX/MSR VMs
8. Ensures two or more DAG members will not be impacted in the event of a single ESXi host failure.

Recommendations for DRS:

1. Set DRS Automation level to “Fully Automated”
2. Setup DRS “Migration Threshold” to “3” (Default)
3. Setup a “VM DRS Group” per Exchange Mailbox VM
4. Setup a “Host DRS Group” on a 1:1 basis with Exchange MSR or MBX VMs
5. Setup a DRS “Virtual Machines to Hosts” rule with the policy “Should run of hosts in group” on a 1:1 basis with Exchange MSR or MBX VMs & ESXi hosts
6. Disable Distributed Power Management (DPM) for hosts running Exchange MBX/MSR VMs.

Back to the Index of How to successfully Virtualize MS Exchange.