How to successfully Virtualize MS Exchange – Part 2 – vCPU Configurations

In Part 1, we discussed how to size Exchange VMs. In Part 2 we will focus on the different vCPU configuration options for Exchange VMs.

Before we start, I wanted to clarify that regardless of if an ESXi host has HT enabled or not, ESXi will always attempt to schedule vCPUs onto Physical Cores. As a result, in most cases vCPUs are equivalent to physical cores but in the event of contention, HTs help prevent CPU ready which can degrade the performance of applications such as Exchange.

Therefore it is recommended to leave HT enabled in virtual deployments.

Now let’s discuss the two main types of vCPU configurations, they are:

1. Wide and Flat
2. PreferHT

Starting with “Wide and Flat“, this refers to a VM which is configured with multiple virtual sockets with 1 core per virtual socket, as shown below.

WideAndFlat

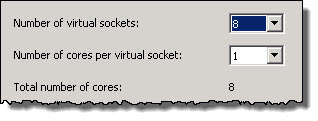
Wide and Flat is recommended for Exchange VMs whose CPU requirements exceed that of a NUMA node as the benefit of the Exchange VM to have more CPU power generally exceeds the value of NUMA memory locality.

However, I still recommend scaling out to at least 4 Exchange VMs before scaling up as discussed in Part 1.

With Wide and Flat configurations in vSphere 5.0 or later, VMs automatically have vNUMA enabled where VMs are 8 vCPUs or higher which means ESXi presents Virtual NUMA to the Guest Operating System which means CPU and Memory can be optimally placed to benefit from NUMA locality.

See the following post on Checking vNUMA topology.

The below shows an example of a Dual Socket ESXi host with 2 x 8 core processors with HT enabled and a VM with 16 vCPUs in a Wide and Flat configuration. This VM is scheduled with a preference to physical cores and only onto HT cores if physical cores are monopolized.

WideandFlat2

Wide and Flat is great for environments where Exchange VMs are dedicated to ESXi hosts OR the host is running other workloads with low vCPU requirements, such as Domain Controllers as the Exchange VM will generally get scheduled onto Physical Cores giving it maximum performance, while smaller less CPU intensive VMs can operate with HT cores without issue.

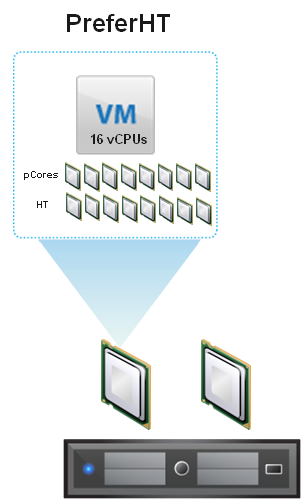
Next lets discuss “PreferHT“. This refers to a VM which is configured to the same number of vCPUs as logical cores (Physical + HT) exist within the NUMA node.

The below shows an example of a Dual Socket ESXi host with 2 x 8 core processors with HT enabled with a VM configured with 16 vCPUs with PreferHT enabled. This VM is getting the full performance of a physical socket.

PreferHT

“PreferHT” can be enabled in two ways, Per VM or Per Host.

I recommend enabling only on a Per VM basis, as this only needs to be done for large business critical applications such as MS Exchange.

To enable “PreferHT” on a per VM basis, Right-click the VM, Edit Settings, Options tab , General then click Configuration Parameters simply add the numa.vcpu.preferHT=TRUE to the advanced configuration file as shown below.

numa.vcpu.preferHT=TRUE

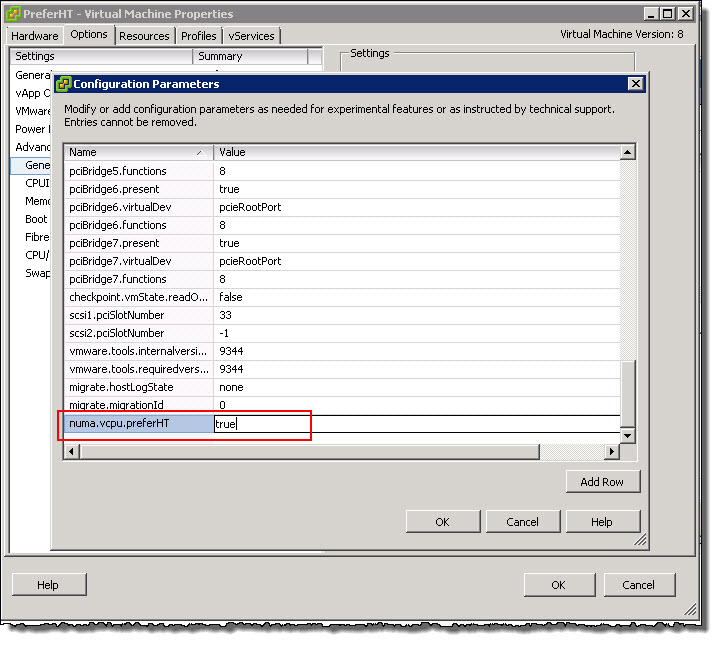
This process is also described in VMware KB 2003582 as well as detailing the way to enable PreferHT for all VMs which as I mentioned I don’t recommend.

PreferHT can be a good option to get the most performance for your Exchange VM without monopolizing all of the host resources, especially in environments where Exchange runs in the same cluster with other VM workloads. PreferHT also gives optimal memory performance as the Exchange VM will benefit from NUMA locality, meaning the CPU and Memory operate within a NUMA node, reducing latency between CPU and Memory.

As Exchange 2013 is especially CPU and RAM heavy, this can provide significant benefits where the Exchange VMs compute requires fit within a NUMA node. However if the compute requirements are greater than the NUMA node, a Wide and Flat configuration is recommended.

Note: The PreferHT configuration allows Exchange VMs to get the full performance of a physical processor and therefore the full SPECint2006 rate for the CPU.

Rule: Take into account Physical CPU core count!

The vCPU configuration should also take into account the underlying physical CPUs as mismatching vCPU numbers to physical CPU size can result in degraded performance.

For example: If you have an ESXi host with 8 core processors, the optimal vCPU configurations are 1,2,4 & 8 vCPUs as these are evenly divisible with 8.

For further information see VMware KB1026063.

Rules of Thumb:

1. If your Exchange VM requirements are ≤ 80% of your NUMA node, use Wide and Flat.
2. If your Exchange VM requirements are > your NUMA node, use Wide and Flat.
3. If you want to maximize your Exchange VMs performance in a mixed workload environment without monopolizing your hosts CPU resources AND the Exchange sizing tool reports CPU utilization for the Exchange VM at ≥80% of the SPECint2006 rate for your processor, use PreferHT.
4. In all other cases use Wide and Flat.

Recommendations:

1. Use “Wide and Flat” CPU configuration by default
2. Size Exchange VMs with your NUMA node in mind
3. Ensure HT is ENABLED on the ESXi host

Back to the Index of How to successfully Virtualize MS Exchange.

How to successfully Virtualize MS Exchange – Part 1 – CPU Sizing

Part 1 will focus on CPU sizing for Exchange Mailbox (MBX) or Multi Server Role (MSR) deployments.

The Exchange 2013 Server Role Requirements Calculator v6.6 should be used to size the VM to ensure sufficient performance for the specific Exchange deployment.

One key input for the calculator is the “SpecInt2006 Rate Value” which can be found on the “Input” tab of the calculator  (shown below).

SPECint2006Input

To find the SpecInt2006 Rate Value for your specific CPU, I recommend using the  Exchange Processor Query Tool which allows you to enter the Processor Model number of your servers and query the Spec.org database for the rating of your CPU.

Note: This tool is applicable to Exchange 2010 and 2013 deployments despite the tool being titled “Exchange 2010 Processor Query Tool”.

To do this, enter the model number of your CPU (example E5-2697 v2 shown below) and press query.

ProcQueryTool01

The calculator will then return the list of tested server in the right hand side of the spreadsheet an example of this is shown below.

ProcQueryTool02

The SpecInt2006 result for your CPU is highlighted in Orange in the “Result” column.

At this stage the drop box in Step 4 allows you to choose the number of physical cores planned to be used and it will then return the average result of all tested servers.

ProcQueryTool03

The above result for example assumes a Dual Socket physical server with 12 core Intel E5-2697 v2 processors.

As we are discussing Virtualizing Exchange, Step 7 is applicable.

Here the tool allows you to enter the overcommitment (vCPU to Physical Core) and the number of vCPUs (called virtual processors in the spreadsheet) which then results in what the spreadsheet calls

“Virtual mailbox server SPECint2006 Rate Value” shown below in Orange.

ProcQueryTool04

The calculator makes the assumption that CPU overcommitment of 2:1 degrades performance by 50% which is not strictly true, but can be used as general guidance that high levels of CPU overcommitment which may lead to CPU contention are not recommended for MS Exchange deployments. It is important to note, CPU overcommitment ≠ CPU contention, although the higher the overcommitment, the higher the possibility of contention (CPU Ready).

Now that we have the SPECint2006 Rate Value, this can be entered into the Primary and Secondary (if applicable) field of the Exchange 2013 Server Role Requirements Calculator (shown below).

SPECint2006ratePrimSec

The SPECInt2006 value is for the physical processor, which if it supports Hyper-threading (HT), means the rating includes the performance benefit of HT. The key point here is using just physical cores for sizing means your VM will not get the full performance of the SPECint2006 rating, it will be slightly less. This will be discussed in more detail in Part 2 – vCPU configurations.

The “Processor Cores / Server” field should be populated by the physical cores intended to be used.

While the “Processor Cores / Server” value does not impact the CPU utilization calculations, entering the “Processor Cores / Server” allows the calculator to report the number Processor Cores Utilized as shown below from the “Role Requirements” tab.

ServerConfigBefore2

The number of cores utilized helps calculate the number of vCPUs required for the Exchange VM. If the “Server CPU utilization” is much lower than 80% (recommended maximum), the “SPECInt2006 rate value” and “Processor Cores / Server” can be reduced.

Example: If the calculator reports Server CPU Utilization at 40% and the CPU Type is Intel E5-2697 v2 with 12 physical cores with a SPECint2006 rating of 479. The Virtual Machine should be sized with 6 vCPU. To confirm this the SPECint2006 rating for Primary and Secondary (if applicable) field of the Exchange 2013 Server Role Requirements Calculator can be reduced by 50% (from 479) too 239.5 which will result in the calculator reporting Server CPU Utilization at 80%.

Another option is to review the number of Mailbox Servers are configured, and where the utilization is low as in the previous example 40%, you could choose to “scale up” each of the Exchange VMs. To do this, change the highlighted field on the “Input” tab of the calculator to 4, and you will see the utilization under “Server configuration” increase (on the role requirements tab) to 80%.

MBXserversPerDAG

Scaling up reduces the number of Windows/Exchange instances licenses and ongoing maintenance (such as patching) required, but also increases the failure domain and impact of a failure so this decision needs to not only be a architectural/technical one, but a business decision.

As a general rule, I recommend customers scale out until they have 4 or more Exchange VMs (across 4 or more ESXi hosts), then scale up (and out) as required. This ensures the impact of a server failure is 25%, compared to 50% if it was a scaled up Exchange server deployment with only 2 VMs.

An important consideration for any business critical application deployment is the scalability of the solution. In this case, when discussing virtualizing one or more Exchange servers, the Virtual Machine maximums are critical.

The below shows the maximum vCPUs supported for a VMware based virtual machine.

vSphere Virtual Machine CPU Maximums

Maximum vCPUs: 64 (vSphere 5.1 or later)
Maximum vCPUs: 32 (vSphere 5.0)
Maximum vCPUs: 8 (vSphere 4.1)

The above numbers are dependant on the physical hardware chosen.

Recommendations for CPU sizing:

1. CPU overcommitment be less than 2:1, and ideally 1:1 for hosts servicing Exchange workloads. This will be discussed further in this series.

Use the vSphere Cluster Sizing Calculator to confirm overcommitment ratios for your cluster or to validate your design.

2. Size Exchange Server VMs to less than 80% CPU Utilization

This allows for burst activity such as increased load or DAG failovers.

3. Scale up a single Exchange VM per ESXi host as opposed to running multiple smaller Exchange VMs per host.

4. Do not oversize Exchange VMs Day 1, Size for Day 1 demand and scale vCPUs as required (which can be done quickly and easily thanks to the virtual layer).
5. CPU reservations do not solve CPU scheduling contention (a.k.a CPU Ready). CPU reservations should not be required in properly sized environments.
6. Size Exchange VMs using Physical Cores and assume no benefit from HT
7. Leave HT turned on at the ESXi layer

Back to the Index of How to successfully Virtualize MS Exchange.

VMworld then and now! (2013 vs 2014)

Last year I did an interview with Eric Sloof @esloof of VMworld TV (below) where we discussed the basics (or the 101) of Nutanix and this was the theme of questions from attendees throughout the Solutions Exchange.

Meet the team behind Nutanix VMworld 2013 – https://www.youtube.com/watch?v=T56KBaB3OUk

Jump forward to this years VMworld (2014) and I was lucky enough to get an opportunity to interview with  VMworld TV again. Eric and I agreed that we didn’t want a simple repeat of last years interview, but talk about more benefits of the platform (or the 201 level).

Nutanix speaks to VMworld TV about their exciting new products – https://t.co/brA15Zgcql

The interesting part of VMworld 2014 and my time on the booth, the theme of questions from attendees was significantly different from last year, and in large part was focused on Business Critical Applications and Server workloads from both prospective and existing customers.

One of my focusses over the last year has been Business Critical Applications and improving the Nutanix platform for these workloads. I am proud to say we (Nutanix) has made significant improvements in this area and we have a strong offering especially with the new NX-8150 platform which my team were responsible for designing.

I am looking forward to interviewing at next years VMworld and covering the Advanced/Expert level topics (301 level) with Eric and the fantastic VMworld TV crew.