
Public cloud offerings for “hyperscalers” such as AWS EC2, Microsoft Azure & Google GCP provide a lot of value when it comes to be able to stand up and run virtual workloads in a timely manner and provide various capabilities to create globally resilient solutions.
All of these offerings also boast a varying/wide range of native services which can compliment or replace services running in traditional virtual machines.
As I’ve previously stated in a post from August 2022, Direct to Cloud Value – Part 1, the hyperscalers have two major advantages customers can benefit from:
- A Well understood architecture
- Global availability
Designing, deploying and maintaining “on-premises” infrastructure on the other hand is often far less attractive from a time to value perspective and requires significant design efforts by highly qualified, experienced (and paid) individuals in order to get anywhere close to the scalability, reliability and functionality of the hyperscalers.
On-premises infrastructure may not be cost effective for smaller customers/environments who don’t have the quantity of workloads/data to make it cost effective, so “native” public cloud solutions at a high level are often a great choice for customers.
The problem for many customers is they’re established businesses with a wide range of applications from numerous vendors, many of which are not easy to simply migrate to a public cloud provider.
Workload refactoring is often a time consuming and complex task which is not always able to be achieved in a timely manner, and in many cases not at all.
Customers also rarely have the luxury of starting from and/or just building a greenfield environment due to the overall cost and/or the requirement to get a return on investment (ROI) from existing infrastructure.
Customers often have the requirement to burst during peak periods which isn’t something easily achievable on-premises. Customers often need to significantly oversize their on-premises infrastructure just to be able to support end of month, quarter or peak periods such as “Black Friday” for retailers.
This oversizing does help mitigate risks and deliver business outcomes, but it comes at a high cost (CAPEX).
Enter the “Hyperscaler + Hypervisor” model.
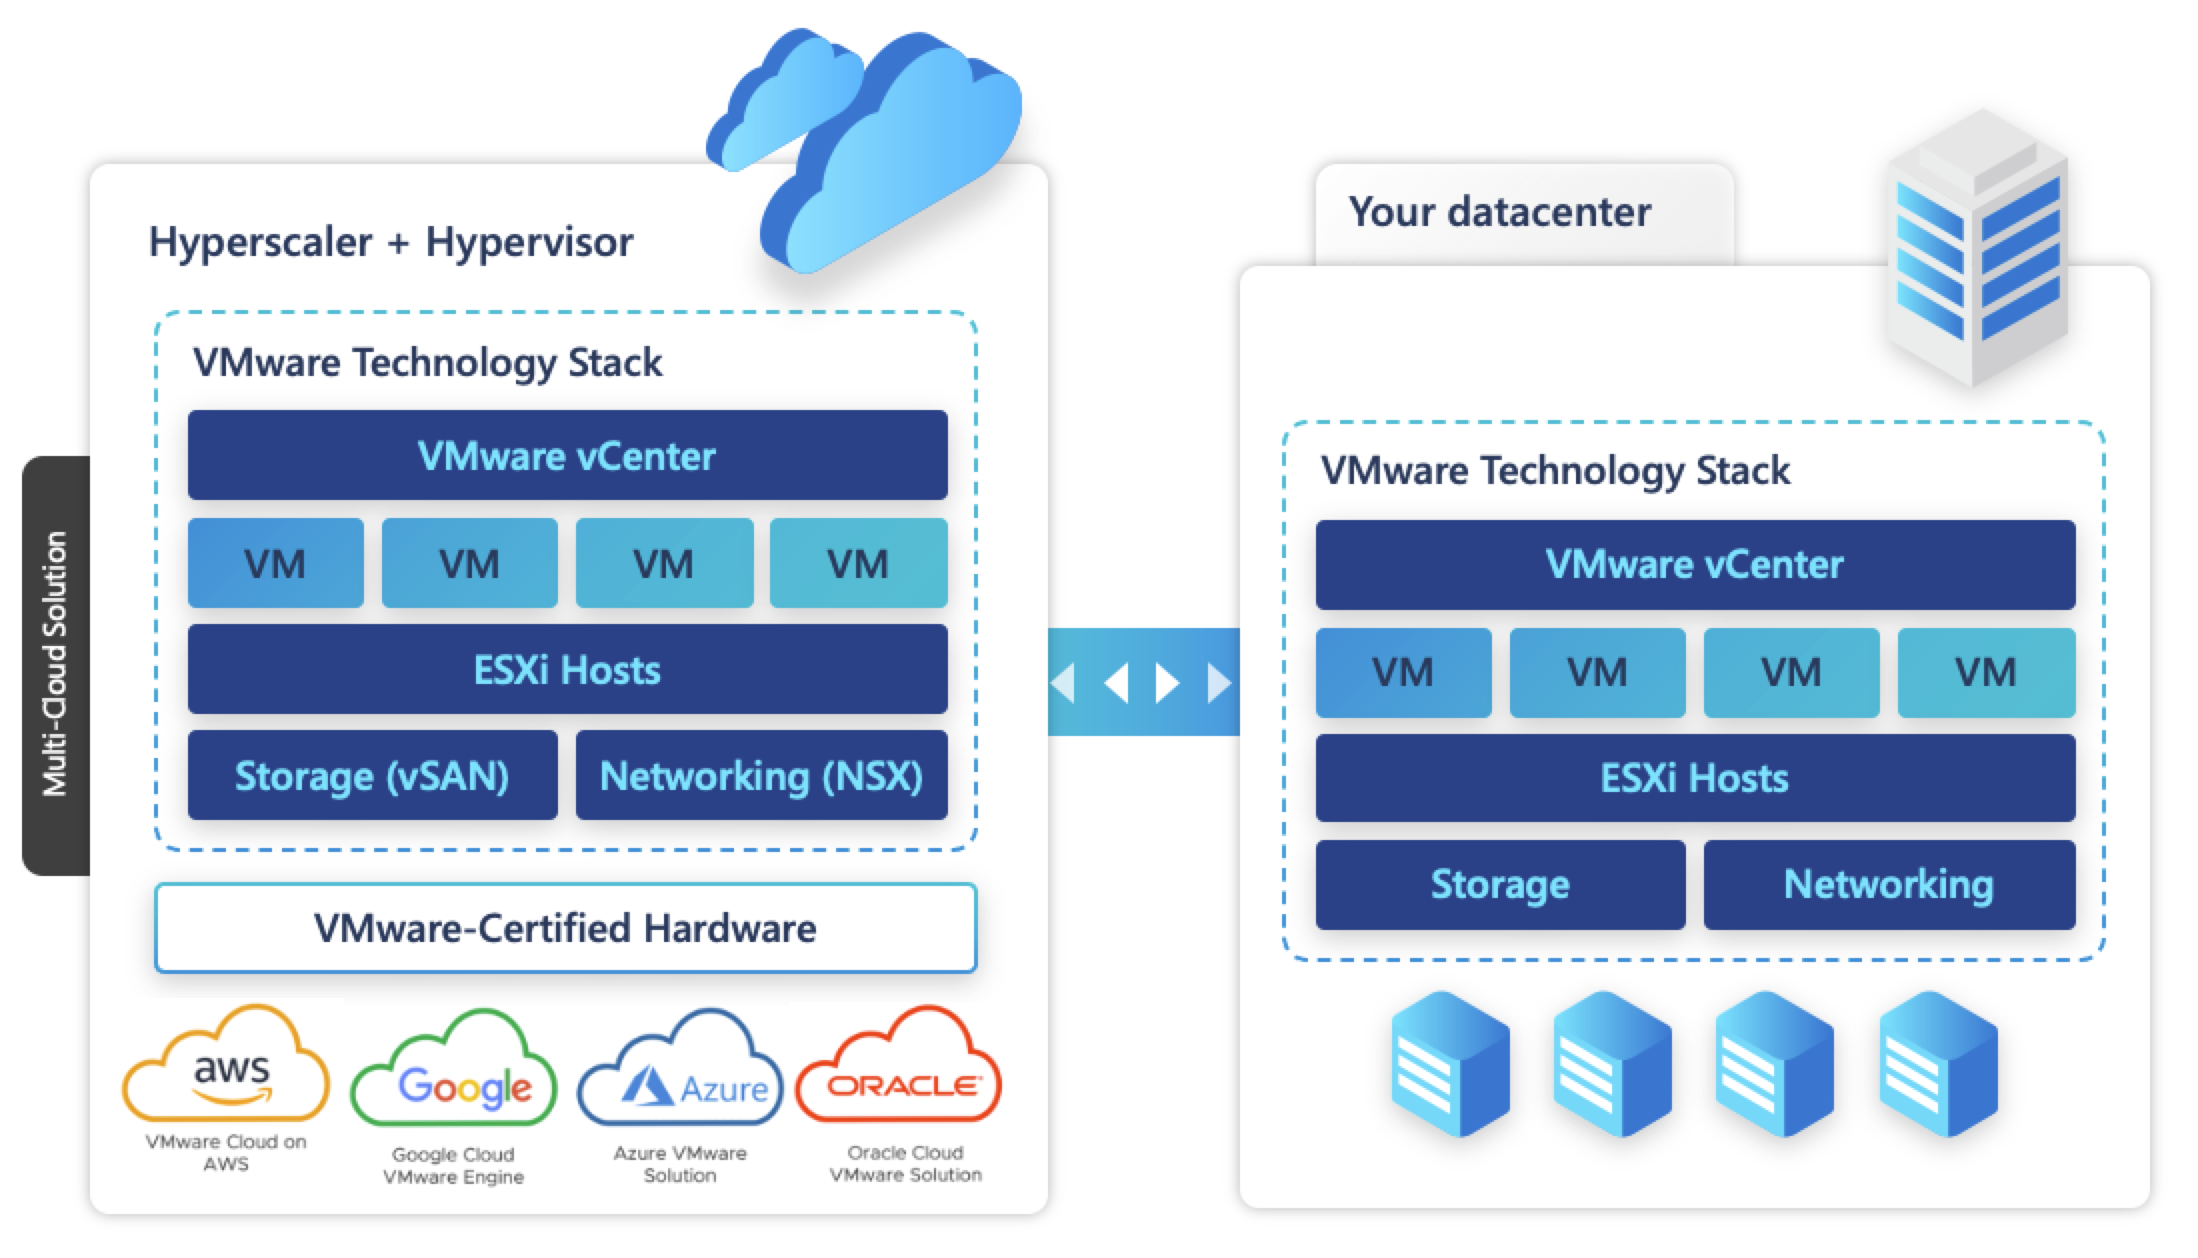
The hyperscaler + hypervisor model is where the hyperscaler (AWS/Azure/Goolgle) provides bare metal servers (a.k.a instances) where a hypervisor (in the above example, VMware ESXi) is running along with Virtual SAN (a.k.a “vSAN”) to provide the entire VMware technology stack to run Virtual Machines (VMs).
Nutanix has a similar offering called “Nutanix Cloud Clusters” or “NC2” using their own hypervisor “AHV”.
Both the VMware & Nutanix offerings gives the same look/feel to their customers as they have today on-premises.
The advantages of the hyperscaler + hypervisor model are enormous from both a business and technical perspective, the following are just a few examples.
- Ease of Migration
A migration of VMware based workloads from an existing on-premises environment can be achieved using a variety of methods including VMware native tools such HCX as well as third party tools from backup vendors such as Commvault without having to refactor workloads.
This is achieved without the cost/complexity and delay of refactoring workloads.
- Consistent look and feel
The Hyperscaler + hypervisor options provide customers access to the same management tools they’re used to on-premises meaning there is minimal adjustment required for I.T teams.
- Built-in Cloud exit strategy / No Cloud Vendor “Lock in”
The hypervisor layer allows customers to quickly move from one hyperscaler to another again without refactoring, giving customers real bargaining power when it comes to negotiating commercial arrangements.
It also enables a move off public cloud back to on-premises.
- Faster Time to value
The ability to stand up net new environments typically within a few hours gives customers the ability to respond to unexpected situations as well as new projects without the time/complexity of procurement and designing/implementing new environments from the ground up.
One very important value here is the ability to respond to critical situations such as ransomware by standing up an entirely isolated net new infrastructure to restore known good data. This is virtually impossible to do on-premises.
- Lower Risk
In the event of a significant commercial/security/technical issue, a hyperscaler + hypervisor environment can be scaled up, migrated to a new environment/provider or isolated.
This model also mitigates against the delays caused by under-sizing or failure scenarios where new hardware needs to be added as this can occur typically within an hour or so as opposed to days/weeks/months.
As in the next example, workloads can simply be “lifted and shifted” minimising the number of changes/risks involved with a public cloud migration.
In the event of hardware failures, new hardware can be added back to the environment/s straight away without waiting for replacement hardware to be shipped/arrive and be installed. This greatly minimises the chance of double/subsequent failures causing an impact to the environment.
In the case of a disaster such a region failure, a new region can be scaled up to restore production whereas standing/scaling up a new on-prem environment is unlikely to occur in a timely manner.
- Avoiding the need to “re-factor” workloads
Simply lifting and shifting workloads “as-is” on the same underlying hypervisor ensures the migration can occur with as few dependancies (and risks) as possible.
- Provides excellent performance
The hardware provided by these offerings varies but often are all NVMe storage with latest or close to latest generation CPU/Memory, ensuring customers are not stuck with older generation hardware.
Having all workloads share a pool of NVMe storage also avoids the issue where some instances (VMs) are assigned to a lower tier of storage due to commercial cost constraints which can have significant downstream effects on other workloads/applications.
The all NVMe option in hyperscalers + hypervisor solutions becomes cost effective due to the economies of scale and elimination of “Cloud waste” which I will discuss next.
In many cases customers will be moving from a multiple year old hardware & storage solutions, simply having an all NVMe storage layer can reduce latency and subsequently make more efficient use of CPU/Memory often resulting in significant performance improvements let alone newer generation CPUs.
- Economies of scale
In many cases, purchasing on a per instance (VM) basis may be attractive in the beginning, but when you reach a certain level of workloads, it makes more sense to buy in bulk (i.e.: A bare metal instance) and run the workloads on top of a hypervisor.
This gives the customer the benefit of the hypervisors ability to efficiently and effectively oversubscribe CPU and with a hyper-converged (HCI) storage layer (Virtual SAN a.k.a vSAN or Nutanix AOS) customers benefit from the native data reduction capabilities such as Compression, Deduplication and Erasure Coding.
- Avoids native cloud instance constraints a.k.a “Cloud waste”
Virtual Machine “right-sizing” is to this day one of the most under-rated tasks but this can provide not only lower cost, but significant performance improvements for VMs. Cloud Waste occurs when workloads are forced into pre-defined instance sizes where small amounts of resources such as vCPUs or vRAM are assigned to the VM, but not required/use.
When we have the hypervisor layer, instance sizes can be customised to the exact requirements and eliminate cloud waste which I’ve personally observed in many customer environments to be in the range of 20-40%.
Credit: Steve Kaplan for coining the term “Cloud Waste”.
- Increased Business Continuity / Disaster Recovery options
The cost/complexity involved with building business continuity and disaster recovery (BC/DR) solutions often lead to customers having to accept and try to mitigate significant risks to their businesses.
The hyperscaler + hypervisor model provides a number of options to have very cost effective BC/DR solutions including across multiple providers to mitigate against large global provider outages.
- An OPEX commercial model
The ability to commit to a monthly minimum spend to get the most attractive rates while having the flexibility to burst when required (albeit at a less attractive price) means customers don’t have to try and fund large CAPEX projects and have the ability to scale in a “just in time” fashion.
Cost
This sounds to good to be true, what about cost?
On face value, these offerings can appear expensive compared to on-premises equivalents, but from the numerous assessments I’ve conducted I am confident the true cost is closer to or even cheaper than on-premises especially when a proper Total Cost of Ownership (TCO) is performed.
Compared with “native cloud” i.e.: Running workloads without the hypervisor layer, the hyperscaler + hypervisor solution will typically save customers 20-40% while providing equal or better performance and resiliency.
One other area which can make costs higher than necessary is a lack of optimisation with the workloads. I highly recommend for both on-premises and hyperscaler models that customers engage an experienced architect to review their environment thoroughly.
The performance benefits of a right sizing exercise are typically be significant AND it saves valuable IT resources (CPU/RAM). It also means less hardware is required to achieve the same or even a better outcome and therefore lowering costs.
Summary
The hyperscaler + hypervisor model has many advantages both commercially and technically and with the ease of setup, migration to and scaling in public cloud, I expect this model to become extremely popular.
I would strongly recommend anyone looking at replacing their on premises infrastructure in the near future do a thorough assessment of these offerings against their business goals.
End-2-End Enterprise Architecture (@E2EEA) has multiple highly experienced and certified staff at the highest level with both VMware (VCDX) and Nutanix (NPX) technologies and can provide expert level services to help you assess the hyperscaler + hypervisor options as well as design and deliver the solution.
E2EEA can be reached at sales@e2eea.com


