SQL & Exchange performance in a Virtual Machine

The below is something I see far to often: An SQL or Exchange virtual machine using a single LSI Logic SAS virtual SCSI controller.

LSIlogic

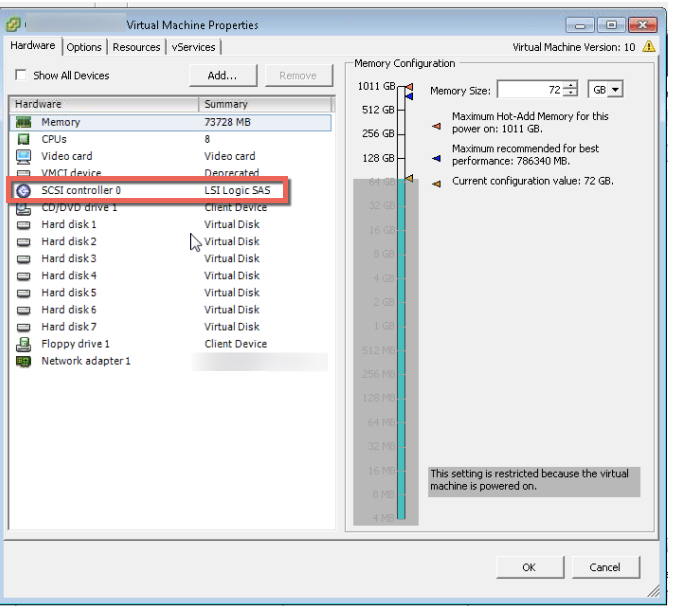
What is even worse is a virtual machine using a single LSI controller and a single virtual disk for one or more databases and logs (as shown above).

Why is this so common?

Probably because the LSI Logic SAS controller is the default for Windows 2008/2012 virtual machines and additional SCSI controllers are not automatically added until you have more than 16 virtual disks for a single VM.

Why is this a problem?

The LSI controller has a queue depth limit of 128, compared to the default limit for PVSCSI which is 256, however it can be tuned to 1024 for higher performance requirements.

As a result, the a configuration with a single LSI controller and/or a limited number of virtual disks can artificially significantly constrain the underlying storage from delivering the performance it is capable of.

Another problem with the LSI controller is the amount of CPU it uses is higher than the PVSCSI controller for the same IO levels. This means you’re wasting virtual machine (and the underlying hosts) CPU resources unnecessarily.

Using more CPU could lead to other problems such as CPU Ready which can also lead to reduced performance.

A colleague and friend of mine, Michael Webster wrote a great post titled: Performance Issues Due To Virtual SCSI Device Queue Depths where he shows the performance difference between SATA, LSI and PVSCSI controllers. I highly recommend having a read of this post.

What is the solution?

Using multiple Paravirtual (PVSCSI) adapters with virtual disks evenly spread over the four controllers for Windows virtual machines is a no brainer!

This results in:

  1. Higher default queue depth
  2. Lower CPU overheads
  3. Higher potential performance

How do I configure this?

It’s fairly straight forward, but don’t just change the LSI Controller too PVSCSI as the Guest OS may not have the driver installed which will result in the VM failing to boot.

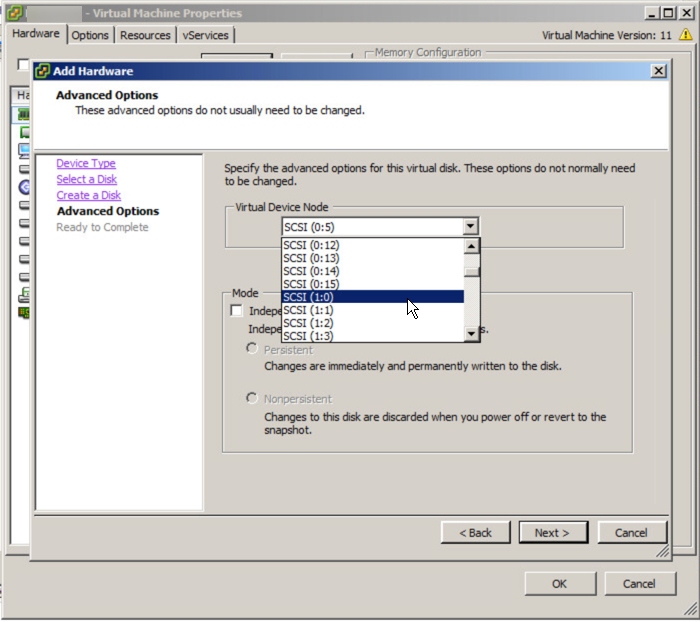
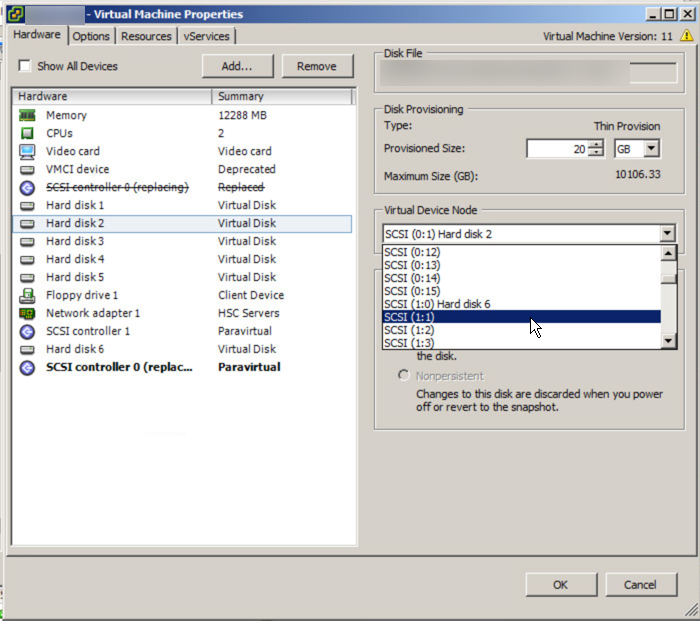
Too avoid this, simply edit the virtual machine and add a new Virtual Disk of any size and for the virtual device node, select SCSI (1:0) and follow the prompts.

VirtualDiskSCSI10

Once the new virtual disk is added you should see a new LSI Logic SAS SCSI controller is added as shown below.

NewLSIController

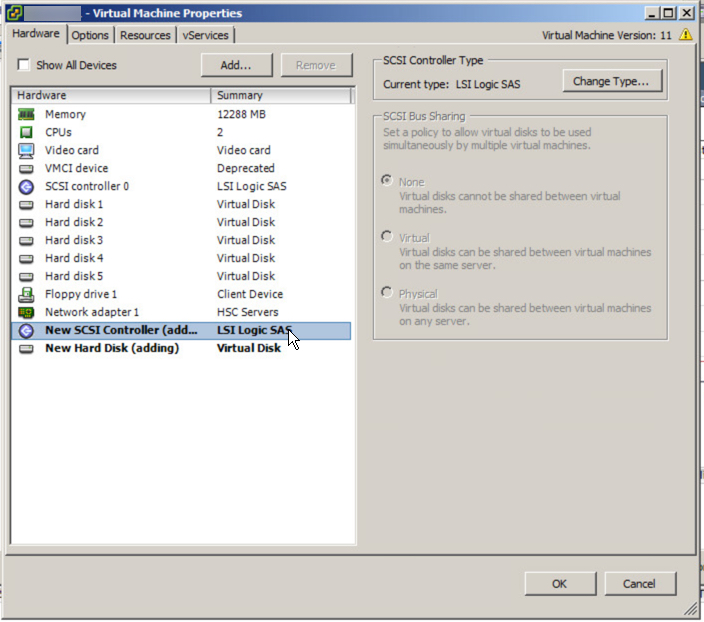
Next highlight the adapter and select “Change Type” in the top right hand corner of the window and select Paravirtual. Once this is complete you should see similar to the below:

AddPVSCSIController

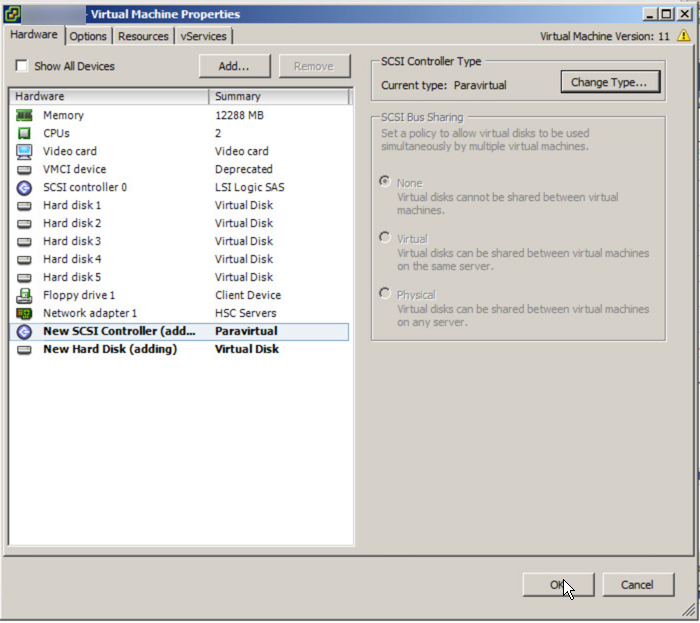
Next hit “Ok” and the new Controller and virtual disk will be added to the VM.

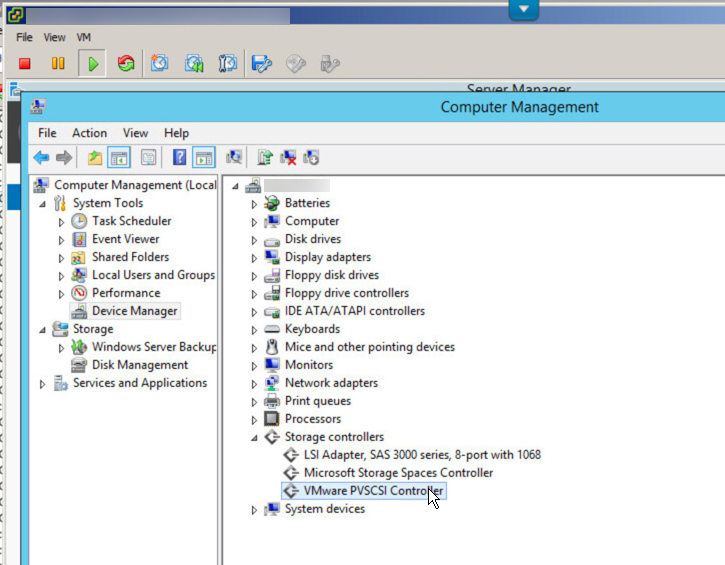
Now we open the console of the VM and open Compute Management and goto Device Manager. Under Storage Controllers you should now see VMware PVSCSI Controller as shown below.

DeviceManagerPVSCSI

Now we are safe to Shutdown the VM.

Once the VM is shutdown, Edit the VM setting and highlight the SCSI Controller 0 and select Change Type as we did earlier and select Paravirtual. Once this is done you will see the original controller is replaced with a new controller.

ChangeLSItoPVSCSI

Now that we have the boot drive change to PVSCSI, we can now balance the data drives across up to four PVSCSI controllers for maximum performance.

To do this, simply highlight a Virtual Disk and drop down the Virtual Device Node and select SCSI (1:0) or any other available slot on the SCSI (1:x) controller.

ChangeControllerID

After doing this you will see new SCSI controllers appear and you need to change these to Paravirtual as we have done to the first controller.

ChangeControllerIDMultipleVdisks

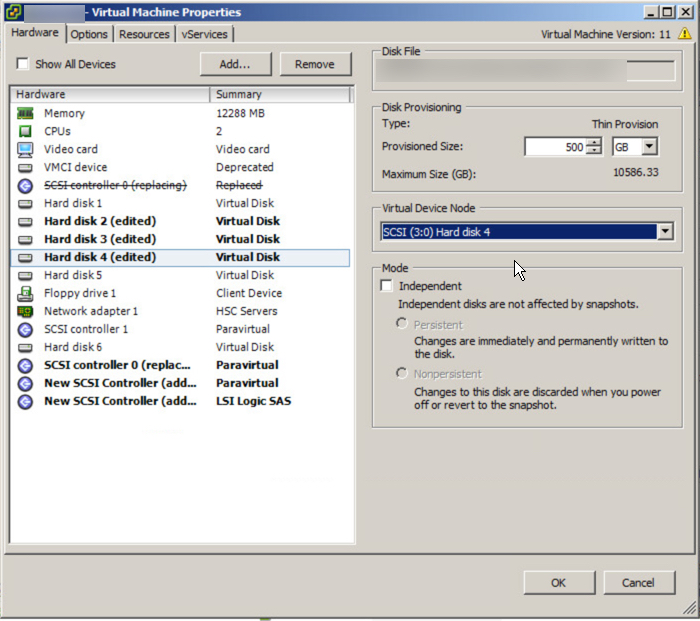
For each of the virtual disks, ensure they are placed evenly across the PVSCSI controllers. For example, if you have a VM with eight virtual disks plus the OS disk, it should look like this:

Virtual Disk 1 (OS) : SCSI (0:0)
Virtual Disk 2 (OS) : SCSI (0:1)
Virtual Disk 3 (OS) : SCSI (1:0)
Virtual Disk 4 (OS) : SCSI (1:1)
Virtual Disk 5 (OS) : SCSI (2:0)
Virtual Disk 6 (OS) : SCSI (2:1)
Virtual Disk 7 (OS) : SCSI (3:0)
Virtual Disk 8 (OS) : SCSI (3:1)
Virtual Disk 9 (OS) : SCSI (0:2)

This results in two data virtual disks per PVSCSI controller which evenly distributes IO across all controllers with the exception being first controller (SCSI 0) also hosting the OS drive.

What if I have problems?

On occasions I have seen problems with this process which has resulted in VMs not booting, however these issues are easy to fix.

If your VM fails to boot with a message like “Operating System not found”, I suggest you panic! Just kidding, this is typically just the boot order of the Virtual machine has been screwed up. Just go into the bios and check the boot order has the PVSCSI controller showing and the correct virtual disk in first priority.

If the VM boots and BSOD or crashes and goes into a continuous reboot loop then power off the VM and set the first SCSI controller where the boot disk is running back to LSI. Then reboot the VM and make sure the PVSCSI driver is showing up (if its not you didn’t follow the above instructions) so go back and follow them so the PVSCSI driver is loaded and working, then shutdown and change the SCSI controller back to PVSCSI and you should be fine.

If the VM boots and one or more drives do not show up in my computer, go into Disk Manager and you may see the drives are marked as offline. Simply right click the drive and mark it as online and reboot and you’re good to go.

Summary:

If you have made the intelligent move to virtualize your business critical applications, firstly congratulations! However as with physical hardware, Virtual machines also have optimal configurations so make sure you use PVSCSI controllers with multiple virtual disks and have your DBA span the database across multiple virtual disks for maximum performance.

The following post shows how to do this in detail:

Splitting SQL datafiles across multiple VMDKs for optimal VM performance

If the DBA is not confident doing this, you can also just add multiple virtual disks (connected via multiple PVSCSI controllers) and create a stripe in guest (via Disk Manager) and this will also give you the benefit of multiple vdisks.

Related Articles:

1. Peak Performance vs Real World Performance

2. Enterprise Architecture & Avoiding tunnel vision

3. Microsoft Exchange 2013/2016 Jetstress Performance Testing on Nutanix Acropolis Hypervisor (AHV)

Jetstress Performance Testing on Nutanix Acropolis Hypervisor (AHV) – Part 1 – The Baseline Test

The following is Part 1 of the Jetstress performance testing on Nutanix Acropolis Hypervisor (AHV) series of videos.

This video shows the following:

  1. Stopping/Starting the NDSF cluster to ensure a fair starting point (No artificial pre warming of cache etc)
  2. The Performance required for 2500 Exchange Users (100 messages / Day with 2 DAG copies) being 732 Jetstress IOPS as per MS Exchange Server role requirements calculator.
  3. The Performance achieved by Jetstress with 8 threads using 8 vDisks (4 for DB, 4 for Logs)

The reason the demonstration is limited to 2500 users is because the Virtual machine compute requirements already is over the maximum recommended RAM for an Exchange 2013/2016 Server (96GB). As such, no additional storage performance is required as compute is more often than not the constraining factor.

For more information see: Peak performance vs Real World – Exchange

Note: This demonstration is not showing the peak performance which can be achieved by Jetstress on Nutanix. In fact it’s running on a ~3 year old NX-3450 with Ivy Bridge processors and Jetstress is tuned (as the video shows) to a low thread count which still achieves >3x the required IOPS for 2500 Exchange users.

Part 1

Return to the Table of Contents

Why Nutanix Acropolis hypervisor (AHV) is the next generation hypervisor – Part 6 – Performance

When talking about performance, it’s easy to get caught up in comparing unrealistic speed and feeds such as 4k I/O benchmarks. But, as any real datacenter technology expert knows, IOPS are just a small piece of the puzzle which, in my opinion, get far too much attention as I discussed in my article Peak Performance vs Real World Performance.

When I talk about performance, I am referring to all the components within the datacenter including the Management components, Applications/VMs, Analytics, Data Resiliency and everything in between.

Let’s look at a few examples of how Nutanix XCP running Acropolis Hypervisor (AHV) ensures consistent high performance for all components:

Management Performance:

The Acropolis management layer includes the Acropolis Operating System (formally NOS), Prism (HTML 5 GUI) and Acropolis Hypervisor (AHV) management stack made up of “Master” and “Slave” instances.

This architecture ensures all CVMs actively and equally contribute to ensuring all areas of the platform continue running smoothly. This means there is no central application, database or component which can cause a bottleneck, being fully distributed is key to delivering a web-scale platform.

AcropolisCluster1

Each Controller VM (CVM) runs the components required to manage the local node and contribute to the distributed storage fabric and management tasks.

For example: While there is a single Acropolis “Master” it is not a single point of failure nor is it a performance bottleneck.

The Acropolis Master is responsible for the following tasks:

  1. Scheduler for HA
  2. Network Controller
  3. Task Executors
  4. Collector/Publisher of local stats from Hypervisor
  5. VNC Proxy for VM Console connections
  6. IP address management

Each Acropolis Slave  is responsible for the following tasks:

  1. Collector/Publisher of local stats from Hypervisor
  2. VNC Proxy for VM Console connections

Regardless of being a Master or Slave, each CVM performs the two heaviest tasks: The Collection & Publishing of Hypervisor stats and, when in use, the VM console connections.

The distributed nature of the XCP platform allows it too achieve consistently high performance. Sending stats to a central location such as a central management VM and associated database server not only can become a bottleneck, but without introducing some form of application level HA (e.g.: SQL Always On Availability Group) it also could be a single point of failure which is for most customers unacceptable.

The roles which are performed by the Acropolis Master are all lightweight tasks such as the HA scheduler, Network Controller, IP address management and Task Executor.

The HA scheduler task is only active in the event of a node failure which makes it a very low overhead for the Master. The Network Controller task is only active when tasks such as new VLANs are being configured and Task Execution is simply keeping track of all tasks and distributing them for execution across all CVMs. IP address management is essentially a DHCP service, which is also an extremely low overhead.

In part 8, we will discuss more about Acropolis Analytics.

Data Locality

Data locality is a unique feature of XCP where new I/O writes to the local node where the VM is running as well as replicated to other node/s within the cluster. Data locality eliminates the requirement for servicing subsequent Read I/O by traversing the network and utilizing a remote controller.

As VMs migrate around a cluster, Write I/O is always written locally and remote reads will only occur if remote data is accessed. If data is remote and never accessed, no remote I/O will occur. As a result, it is typical for >90% of I/O to be serviced locally.

Currently bandwidth and latency across a well designed 10Gb network may not be an issue for some customers, however as flash performance exponentially increases the network could quite easily become a major bottleneck without moving to expensive 40Gb (or higher) networking. Data locality helps minimize the dependency on the network by servicing the majority of Read I/O locally and by writing one copy locally it reduces the overheads on the network for Write I/O. Therefore Data Locality allows customers to run lower cost networking without compromising performance.

While data locality works across all supported hypervisors,  AHV is unique as it supports data-aware virtual machine placement:  Virtual Machines are powered onto the node with the highest percentage of local data for that VM which minimizes the chance of remote I/O and reduces the overheads involved in servicing I/O for each VM following failures or maintenance.

In addition, Data Locality also applies to the collection of back end data for Analysis such as hypervisor and virtual machine statistics. As a result, statistics are written locally and a second (or third for environments configured with RF3) written remotely. This means stats data which can be a significant amount of data has the lowest possible impact on the Distributed File System and cluster as a whole.

Summary:

  1. Management components scale with the cluster to ensure consistent performance
  2. Data locality ensures data is as close to the Compute (VM) as possible
  3. Intelligent VM placement based on Data location
  4. All Nutanix Controller VMs work as a team (not in pairs) to ensure optimal performance of all components and workloads (VMs) in the cluster

Back to the Index